Refurbishment & Repair
Tellerex’s Parts Subscription Program is a cost-effective, all-inclusive solution for managing your ATM parts inventory.
Tellerex’s Refurbishment Solutions are designed to extend the lifespan of financial equipment, ensuring that ATMs and Teller Cash Recyclers (TCRs) meet high-performance standards while aligning with environmental sustainability and cost efficiency goals.
Our eight-phase refurbishment process ensures that each unit undergoes a meticulous inspection, repair, and restoration, bringing it to like-new condition.
This comprehensive approach allows our clients to maximize asset value and minimize waste, all while meeting rigorous industry standards.
Tellerex’s Refurbishment & Repair Service Process
Tellerex’s Refurbishment Solutions go beyond basic repairs, providing a transformative process that restores financial equipment to its full potential.
With a focus on quality, sustainability, and attention to detail, Tellerex’s refurbishment process is a cornerstone of our EcoLogix lifecycle management solution, delivering value, reliability, and environmental benefits to financial institutions.

PHASE I – INITIAL ASSESSMENT
The refurbishment process begins with a detailed initial assessment of each unit. During this phase, we:
-
Verify the serial number for accurate tracking.
-
Conduct a visual audit of all modules, rails, and components to identify any immediate repair needs.
-
Assess the body and paint condition to determine any cosmetic or structural work required.
PHASE II – HEALTH CHECK
In this phase, we conduct an in-depth diagnostic review to assess the functional integrity of each unit:
-
Power up the unit and verify that power supplies and distribution boxes are operating correctly.
-
Configure the unit for diagnostic mode and conduct health checks across all major modules and MEI lights.
-
Update production orders for any components that require repair or replacement, sending them to the parts lab.
-
Verify that the PC cores meet minimum performance standards, and update orders for necessary upgrades.
PHASE III – DISASSEMBLY
After the health check, each unit is carefully disassembled to allow for thorough refurbishment:
-
Remove all branding, decals, and external identifiers.
-
Fully disassemble the unit, labeling all modules with the parent serial number for tracking and reassembly accuracy.
-
Remove body panels and tag them for any required bodywork or paint preparation.
PHASE IV – PAINT & BODY
The Paint & Body phase focuses on restoring the aesthetic and structural quality of each unit:
-
Repair all body defects to restore the unit’s structural integrity.
-
Detail the underbody to enhance durability and appearance.
-
Sand the unit as needed for a complete repaint.
-
Apply a full paint process, covering both internal and external vault surfaces to ensure a professional, like-new appearance.
PHASE V – PARTS REPAIR & DETAILING
Each module and component undergoes individual inspection, repair, and detailing to ensure optimal functionality:
-
Repair all modules as required to meet operational standards.
-
Replace consumable components that show wear.
-
Integrate new modules as needed, ensuring compatibility and performance.
-
Detail all modules and conduct bench testing to confirm operability, ensuring a fully functional unit ready for reassembly.
PHASE VI – REASSEMBLY
Once the components have been restored, the unit is carefully reassembled:
-
Mount the chassis on a custom pallet to ensure stability.
-
Reinstall all repaired modules, ensuring correct placement and functionality.
-
Reattach body panels, inspecting each for paint quality and fit.
-
Conduct a final visual inspection of all modules, verifying correct installation, cable management, and assembly integrity.
PHASE VII – QUALITY CONTROL
Our Quality Control team performs a comprehensive check to ensure the unit meets Tellerex’s stringent standards:
-
Post-test all modules with detailed evidence, including test slips and/or video documentation.
-
Complete the unit QC checklist, which is reviewed and signed off by the Quality Assurance team.
-
Document the serial numbers of locks and Encryption Pin Pads (EPPs) for security and tracking.
-
Securely bolt the unit to the pallet for transit, vacuum the vault interior, and secure all shipping brackets, bolts, and screws.
-
Place startup kits in the top of the unit and bag the ATM keys, taping them to the unit’s exterior for easy access.
-
Perform a final cleaning, wiping down the entire unit for a professional presentation.
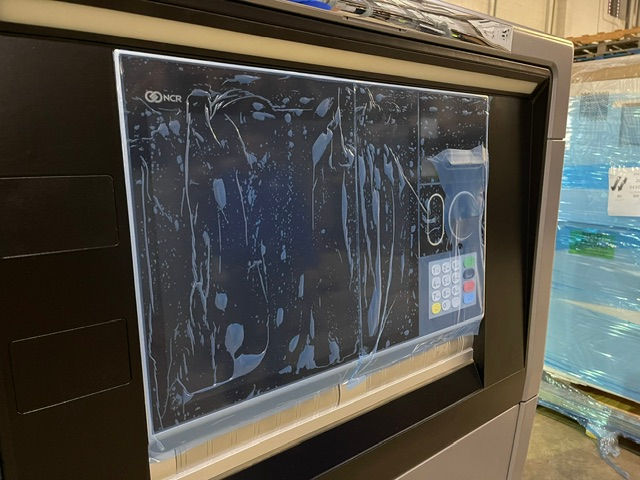
PHASE VIII – SHIPPING PREP
Our packaging process ensures the unit is secure and ready for transit, protecting it against damage:
-
Apply a blue protective film to the main touchscreen and operator panel to prevent scratches.
-
Install protective packaging foam to immobilize modules during transit.
-
Verify that the ATM is securely bolted for stability.
-
Photograph the fully prepared unit, attaching these images to the sales order in Tellerex’s ERP system for client transparency.
-
Wrap and strap the unit in a new shipping box with a secure lid, attaching the box to the pallet.
-
Place a model/serial placard on the front of the unit for easy identification.
-
Move the packaged unit to inventory racking or shipment staging, depending on its next destination.
